LOVE, HUGS, KISSES 4EVR

I am blessed with a serious surfeit of alphabet blocks. As in, once I culled an entire set for my kid, I still had an small shipping carton full.  Yeah, thrift stores have been good to us.  And I have a lot of thrifty friends who know I Like That Sort of Thing, so they pass them along.  Although I’ll never approach the heights of elaborate holiday preparation I’m seeing on some of the blogs I read, I still thought I’d get a little creative and have some fun.

Here are some of the letters in their natural state:

Since I want red for my end result, I spray-primed all the ones that weren’t red to start with:

Next, I gave everything a coat of red metalllic paint.  The ones I’d primed, I gave two coats:

Have you figured out where I’m going yet? No? 

Does that help?

I did a very slap-dash job on these, but that’s okay, because if you have looked at a lot of alphabet blocks (heh) you notice that they have varying quality paint jobs and that, over time, some of them get worn and dinged.  So even a lacksadaisical job looks pretty authentic, when you’re done.  I considered gluing the blocks together so that little hands can’t disarrange and lose them, but then I thought… seeing what else we can spell will be part of the fun in coming years and… you know I’ll need to add another initial next year. Have fun!

Just for fun, I’m trying something new that I’ve seen elsewhere.  You can add a link to your own Valentine’s Day blog posts by clicking the link below.  Try it out!  (Please link to a specific post, not your whole blog, or the list won’t make any sense!)

Yes, my son…

There are holidays which are not Christmas and are still fun.

This is a garland I made using the heart pattern from my Valentine’s Day Heart Locket. ({filelink=4})  I made a dozen hearts, wove in the ends, and chain stitched them together, attaching a heart every 20 chain stitches or so.  For extra fun I am considering doing some white ones with picot edging…  This was a good “purse project” for a couple weeks, I used up leftover yarn, and the little dude loves it.

DIY Pet Stain Help

This concoction did a good job of heavy duty odor and stain removal on my light-colored basement carpet, which I had thought a total loss.  (We bought the house with the carpet.  Knowing how many pets we have, we’d have chosen something different.  Note to the world: Step away from the beige carpet.  Do not install that in the basement.  Pick a nice Berber that will work with you when you try to clean up after the occasional damp issue.  It’s a BASEMENT.)

This works on mildew and pet stains, but you’ll need to try something else for rust- lemon juice, salt, and Barkeeper’s friend have all proved minimally effective for me.

1 quart hydrogen peroxide
1 cup washing soda
3 quarts hot water
1/4 cup CLEAR liquid laundry detergent- optional

Mix well.

What you’re doing here is creating an oxygen bleach, chemically similar to OxiClean but at the right strength for the job at hand.  (AND CHEAP.) 

The laundry detergent will help where there are visible stains.  DON’T use a blue variety or you risk staining your carpet or upholstery blue instead.  It’s important to use laundry detergent because it’s low-foaming.  It’s very important to note that WASHING soda, which is very inexpensive, made by Arm & Hammer, and carried around here by Giant, is not the same as Baking Soda.  You’ll find it in the laundry aisle.

I apply this mixture liberally to stains, let it sit for as long as a half hour, and then use my carpet steamer to remove it and rinse the area.  I can’t say it’s restored the carpet to “like new” status, because the repeated application down there has resulted in some wear on the fibers.  But what it DOES do is remove the odor and stains at a fraction of the price of some of the things I tried that didn’t work nearly so well.

You can store leftovers in a closed container.  The hot water is to dissolve the soda; I don’t know that it makes the product more effective to use it warm.

So before you throw something away because you think it can’t be saved, try this.  You’ll be out a couple of bucks if it doesn’t work, which is nothing compared to what you’ll save if it does.

Not a new couch, but…

better! Why?

1. No heavy lifting. Fit in a bag, in my Civic.
2. No rearranging the room to get it in!
3. No calling special pickup for the old one!
4. It’s machine washable!
5. It’s just as comfy as the old one!
6. Price Tag: $18.75 plus tax and one trip through the washer.

I am so thrilled to have found a couch cover for the study at Unique Thrift today… it fits better than I thought possible, and now the marker scribbles, the torn arm (which is featured here, in case you missed it), and the sundry stains are all tidily and cleanly covered up. (Why, you ask, do I have a white couch in my study when I have a small child? Because it was FREE. That’s why.)

I’ve known I should put a cover on that couch for a while, but the holdup was the skinny couch arms. Most covers that are made to fit the narrow arm on this couch are nearly as expensive as getting a new couch… and I confess, my thrifty soul has balked at the idea. But here you have it- the price is right, I didn’t need help with the “heavy lifting,” and it took very little time or effort. My favorite kind of makeover.

Well, it took almost four years, but…

I found and installed curtains I like.  We moved into the house in March 2007, so I guess it’s about time.

I got lucky at the thrift store- I found curtains that worked for three rooms (and possibly a fourth- still working on that!), and, after not only paying way more than seemed reasonable for drapery hardware, but throwing away FAR more trash than you’d think possible from the packaging for a couple of curtain rods, we are in business.  It’s a pity I couldn’t find the hardware at the thrift store, too, but you need all the pieces, they have to be the right size for your window, and must be the right type go with your curtains, so my odds were slim!

The burgundy is flecked with gold and picks up the colors in the chair seats.  It also covers the entire wall from side to side and floor to ceiling.

In case you are thinking that the dining room drapes look a little uneven, it’s because they are.  The window is not centered on the wall, so there are two panels on one side and one panel on the other.  The family that lived here before us built the house for themselves, and one of their (four!!!) daughters informed us that “Mom always said the dining room would have been bigger, except that dad forgot to leave room for the kitchen stove.”  In other words, they adjusted the position of the wall between the kitchen and the dining room, but didn’t move the window accordingly.  These little quirks are why I love this house.

The embroidery is the exact same color as the wall paint!

We had to add some solid panels to make these wider- they were just a SMIDGE small on their own.  The colors look better IRL.

Shedding a little light on things

For instance, I cannot believe how many places under the new lights turned out to be much, much dirtier than I thought.  So, if you’re planning to do this project, allow an hour to take your kitchen apart and empty all the cabinets, 45 minutes to install the lights themselves, and the rest of your day to clean up all the sawdust you create and wipe off all the dirty smudges that are suddenly very obvious.

PS: While I was up on my step stool, I observed that the dirtiest places in the room are those I can’t see from the floor.  What a different world very tall people must live in.

Study Shuffle

Much as I love natural containers like baskets and wood boxes, and use them at every opportunity, there are times when there is just no denying that breaking down and resorting to some plastic storage containers is just plain tidy and convenient.

I had been using wooden boxes to organize the art supply area, and although I prefer the old containers, they did not organize the supplies nearly so handily.  And I can’t say I’m sorry to trade in the teetering pile of puzzles for two tidy drawers full!

Can I just mention here that what was really chapping my behind is the fact that a lot of the puzzles and multi-piece toys came in boxes FIVE TIMES BIGGER than the item within?  Melissa and Doug seemed to be among the best at creating packaging that actually reflects the size of the toy inside.  I used some plastic storage containers from the dollar store to replace the originals- they’re still sturdy, you can see what’s inside, and I could fit them into the bigger drawers or, as you see here, stack them neatly. I thought of plastic zipper bags, but stray plastic bags just look like trash to me and I’d rather not deal with that.

Now when Ian wants to play with one of these toys, I don’t have to dig through whatever cabinet is big enough to hold their crazy boxes, he can point to which one he wants and I can get it down for him.  Then, when he’s done, we pack that one back up and he asks for a different one.

As always, a natural consequence of rearranging the toys is that Ian is playing with things he hasn’t even looked at in ages.  Everyone wins.

Study Shuffle

My new bed is here!

We’ve been talking to Ian about his “new bed” for a while now.  The original plan was for Santa to bring it, but it turns out there were some good Labor Day sales, so it has arrived a bit early.  He’s been going back and forth between being excited about his new bed and telling me he does not want a new bed.

At least, he was until we told him a big truck would deliver his new bed.  He ran into my study every five minutes all day yelling, “My new bed is here!” Finally, he was right.  The truck with his new bed had arrived.  The delivery guys set it up in about five minutes flat.  In fact, it took longer to put the new sheets on than it did for them to unload and set it up.

The minute Ian climbed aboard, he declared, “Wait! I need a book!” He got down to get one and then remembered.  “No, wait, I need all my animals first!”

“Wait for me to clear the animals and come on on the bed, Mommy!”
2010-09-09 Ian’s New Bed

Mommy’s Crew

Each with a potty bag, all set to go!

  Today we went to the hardware store, where my two helpers aided me in choosing paint samples, a new toilet seat, and some door knobs.  The door knobs are needed because our intrepid gang can no longer be deterred with knob covers or other “childproofing” devices, and I have fished them out of my bed one too many times.  (Yeah, I hear you snickering.  YOU see how you feel about pulling a half dozen pairs of toddler shoes out of your bed two or three times a week.  You’ll be washing a lot of sheets.)

The smudges came at no extra charge.

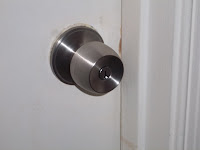
So we installed some brandy-new door knobs with key holes.  I made sure they are all keyed alike so you can use one key to open them all.  I realized I need one more for the bathroom- in case they lock us out of it (again) it will be easier to open from the outside with the “master key” instead of the screwdriver. 

I’m sure some future resident of my home will be wondering exactly WHY I have exterior doorknobs on all of my interior doors, but as far as I’m concerned, that just adds to the fun.  Plus they’ll be no more bumfuzzled than we were when we realized you could only lock our bedroom door from the OUTSIDE when we moved in.  Naturally, Ian has already become adept at locking and unlocking them from the inside, which is good because I don’t want him stuck in there in a blind panic.

Home Grown Modern Art

Next, we went downstairs to put up our sample paint colors.  I liked the orangier color at the store and upstairs, but in the basement I was not completely surprised to discover I like the more yellow tone.  I think I may need to try a lighter blue, too.  The blue is going in the powder room and the yellow/orange is for the main part of the room.  We are getting ever closer to “playroom” status down there.

Ian and his adorable playmate used a couple of (un-loaded) paint rollers to “paint” the carpet while I put up the sample swatches.  I look forward to completing this project with their help.  Ian  also begged for and received permission to help with one of the sample swatches, then immediately rubbed paint on his pants.  Mommy confiscated the paint and the pants and that is all I have to say about that.

For those who are coming in late (since, ha ha, this is the first I’ve mentioned it here on the Blog) I’ve been working my metaphorical fingers to the bone on trying to clean, rearrange, and refurbish our until now un-used basement into a fun playroom space for the kids before autumn brings the deluge.  For the most part it involves a deep cleaning like nothing you’ve ever seen before, some child-proofing, and some upgrades to the bathroom.

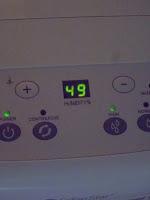
Some of the mechanical systems needed some help, too, so we do have a new dehumidifier that has been working hard for the last week or so.  It took several days, but we have now progressed from the initial humidity reading of muggier than a Florida swamp to hovering around 50%, which is HUGE.  The humidity down there was creating a whole category of issues that I’ll leave to your imagination.  It took the better part of a week to get to this point, probably because we’re talking about a room nearly the size of the footprint of our whole house and because, if I’m honest, dumping huge amounts of water on the carpet to steam clean it is not the best way to reduce the relative humidity.